Converting a van into a campervan is one of the most exciting projects you can take on if you’re looking for adventure, freedom, and self-sufficiency. While the aesthetics of wood panelling, fold-out beds, and clever storage solutions often grab attention, the real backbone of any successful van conversion lies in its electrical system. A properly designed and installed campervan electrical setup powers your lighting, fridge, water pump, phone chargers, and even appliances like laptops or induction cookers. Without electrics, your campervan is just a vehicle with a mattress in the back.
For many first-time converters, wiring can feel intimidating. But the truth is, with the right guidance, high-quality equipment, and a clear campervan wiring diagram, you can safely install a system that meets your travel needs. In this beginner’s guide, we’ll break down the basics of U.K. campervan electrics, explain the role of a solar panel kit, and show you why trusted providers like Renogy UK make the process easier than ever.
Why a Reliable Campervan Electrical System Matters
When you’re on the road, your campervan is your home on wheels. Just like a house, it requires power for daily essentials. Imagine returning from a long hike and wanting to cook dinner using your fridge and lights—without a reliable electrical system, those comforts vanish. The same applies if you’re working remotely; laptops and Wi-Fi routers need consistent power.
Unlike campsites with hookups, wild camping in the U.K. often means living completely off-grid. This makes your onboard power system crucial for independence and sustainability. A thoughtfully designed system ensures:
- Comfort and convenience: Lights, fans, and charging ports make van life livable.
- Food preservation: Running a 12V fridge keeps your food fresh on longer journeys.
- Energy independence: A solar panel kit keeps your batteries topped up even when parked in remote areas.
- Safety: A properly wired system prevents electrical fires, overloads, and unexpected breakdowns.
By following a reliable campervan wiring diagram, you can be confident that your system is not only functional but also safe.
Components of a Campervan Electrical System
Before diving into installation, it’s important to understand the main components that make up a campervan’s electrical setup. Each part plays a vital role, and skipping one can lead to inefficiency or even danger.
1. Leisure Batteries
Leisure batteries store the power you’ll use when the van engine is off. Unlike starter batteries designed for short bursts of energy, leisure batteries provide steady power over long periods. Most U.K. vanlifers choose either AGM deep-cycle batteries or modern lithium batteries, with lithium offering longer life and faster charging.
2. Solar Panel Kit
Adding a solar panel kit is one of the most popular upgrades for campervan owners in the U.K. It allows you to harness the sun’s energy and recharge your batteries throughout the day. Even during the cloudy British summers, high-efficiency panels from companies like Renogy UK provide reliable power. A kit usually includes panels, a solar charge controller, mounting brackets, and cabling.

3. Inverter
An inverter converts 12V DC power from your batteries into 230V AC power, allowing you to use standard U.K. household appliances. Depending on your needs, you can choose between pure sine wave inverters (best for sensitive electronics) or modified sine wave inverters (suitable for simple devices).
4. Fuses and Breakers
Safety should never be overlooked. Fuses and circuit breakers protect your system from overcurrent situations, preventing fires and damage to your equipment. Every circuit in your system should be fused correctly according to its load.
5. Wiring and Connectors
Quality wiring is critical to avoid voltage drops and overheating. A campervan wiring diagram will help you calculate the correct cable sizes for each connection. Marine-grade wiring and crimp connectors are highly recommended for durability and safety.
6. Charging Sources
Besides solar, you can charge your leisure batteries through your alternator (while driving) or through shore power (when connected at a campsite). Combining multiple charging methods ensures you always have backup power.
Understanding a Campervan Wiring Diagram
At first glance, a campervan wiring diagram might seem overwhelming. Lines, symbols, and boxes can look confusing, but in reality, it’s just a roadmap of how electricity flows through your van.
A typical wiring diagram will show:
- Solar panels connecting to a charge controller.
- The controller feeding power into leisure batteries.
- The batteries connected to a fuse box that distributes power to devices (lights, fridge, water pump).
- An inverter attached to the batteries for 230V outlets.
- Additional charging sources such as alternator or shore power feeding into the batteries.
By following this map, you can see exactly where each wire connects, what safety devices are needed, and how power moves through your system. Beginners often find that once they study the diagram step by step, it becomes far less intimidating.
Step-by-Step Guide to Wiring Your Campervan
- Plan Your Power Needs – List all the devices you plan to use, such as lights, fridge, phone chargers, fans, or laptops. Calculate daily watt-hour usage.
- Choose Your Batteries – Decide between AGM or lithium based on budget and lifestyle. Lithium pairs especially well with solar systems.
- Select a Solar Panel Kit – For most small to medium vans, a 200W Renogy UK solar panel kit is ideal. Larger vans or digital nomads may require 300W–400W setups.
- Install a Charge Controller – Connect your solar panels to a charge controller, which then regulates charging into your batteries.
- Wire to a Fuse Box – Run your devices through a fuse panel for organized, safe distribution.
- Add an Inverter if Needed – Install an inverter for appliances requiring 230V AC.
- Test Thoroughly – Use a multimeter to check voltages and confirm everything is wired correctly before connecting appliances.
With patience and attention to detail, following a campervan wiring diagram makes this process achievable even for beginners.
Why Choose Renogy UK for Campervan Electrics?
When selecting components, quality is everything. Cheap, unreliable parts not only perform poorly but also create serious safety risks. Renogy UK has become a trusted supplier for campervan and off-grid setups because their products are designed to handle real-world conditions.
Benefits of Renogy UK products include:
- High efficiency solar panels that perform even in low-light U.K. conditions.
- Durable materials resistant to water, vibration, and temperature changes.
- Complete solar panel kits that include everything you need to get started.
- Reliable charge controllers that maximize battery life.
- Technical support and resources to guide you through installation.
By investing in a Renogy UK solar panel kit, you’re not just buying hardware—you’re buying peace of mind and long-term reliability for your campervan adventures.
Typical Campervan Wiring Diagram
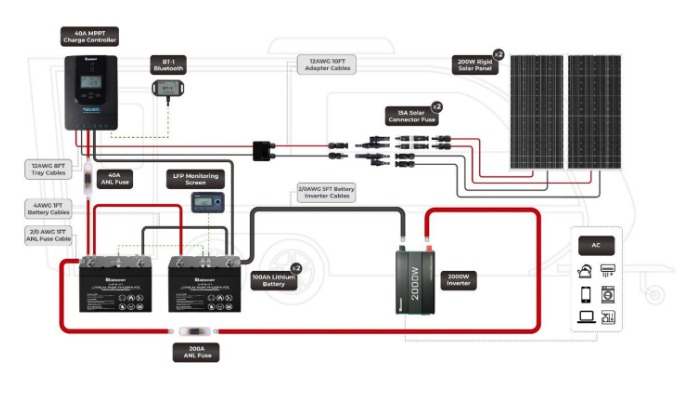
This campervan wiring diagram is a simplified version of what you’ll use in your own build. While setups vary depending on personal needs, most systems follow this same structure. If you’re unsure, it’s always wise to consult with an electrician before finalizing your wiring.
Best Practices for Safe Campervan Wiring
- Always fuse every circuit to prevent electrical fires.
- Label your wires to make troubleshooting easier later.
- Use the right cable size to prevent overheating and power loss.
- Ventilate batteries properly, especially if using lead-acid.
- Test regularly with a multimeter to ensure voltages are correct.
- Carry spares such as fuses and connectors in case of failure on the road.
Final Thoughts
Wiring your campervan might feel intimidating at first, but with the right resources, a clear campervan wiring diagram, and a reliable solar panel kit, it becomes a manageable and even rewarding project. Getting your electrics right is not just about powering devices—it’s about unlocking the freedom to travel wherever you want, live comfortably off-grid, and enjoy true independence.
For beginners in the U.K., brands like Renogy UK make the process straightforward by offering complete solar panel kits, dependable charge controllers, and the support you need to get started. Once installed, you’ll have the confidence of knowing your system is safe, reliable, and ready for the open road.
With the right preparation, your campervan electrics won’t just power your adventures—they’ll power your freedom.