The good news is that a fresh coat of decking paint can completely transform it.
With the right prep and a simple step-by-step approach, you can give your deck a clean, smart finish that looks professionally done without paying for a tradesperson. This guide walks you through exactly how to do it, from preparation to final coat, in a way that is practical and beginner-friendly.
Why Use Decking Paint on Your Deck?
A quality decking paint does more than improve the look of your garden. It also helps protect the wood and can make the surface safer to use.
Here are the main benefits:
1. It refreshes the look instantly
Faded, stained, or uneven boards can make the whole garden feel neglected. A fresh deck paint finish brings everything back to life and gives your outdoor space a cleaner, more polished appearance.
2. It helps protect the timber
Decking is constantly exposed to moisture, UV rays, and temperature changes. Good decking paint creates a protective layer that helps reduce weather damage and extends the life of the wood.
3. It can improve grip underfoot
If your deck gets slippery after rain, using a non slip decking paint is a smart choice. It adds extra traction and helps make the surface safer for children, pets, and anyone walking on it in wet weather.
4. It is an easy DIY upgrade
Compared with replacing boards or rebuilding a deck, painting is a low-cost improvement with a big visual impact. It is one of the most effective weekend jobs for UK homeowners.
Tools and Materials You Will Need
Before you start, gather everything in one place. This makes the job much easier and helps you work steadily once you begin painting.
Tools
- Stiff broom
- Decking brush or scrubbing brush
- Pressure washer (optional, but useful)
- Sandpaper or an electric sander
- Paint scraper
- Paint roller with extension pole
- Paint tray
- Paintbrush (for edges and corners)
- Mixing stick
- Masking tape and dust sheets
Materials
- Exterior wood cleaner or decking cleaner
- Wood filler (for minor cracks or holes, if needed)
- Exterior primer (if required by the paint manufacturer)
- Decking paint (choose a product suitable for exterior timber)
- Non slip decking paint (recommended for slippery areas or family gardens)
Step-by-Step: How to Paint a Deck Like a Professional
This is where the finish is won or lost. The biggest difference between an average result and a professional-looking one is preparation.
Step 1: Choose a dry spell
Always paint your deck in the right weather.
In the UK, this matters more than most people realise. If the timber is damp or rain lands on fresh paint, the finish may not bond properly and can peel sooner than expected.
What to aim for:
- A dry day (ideally dry for 24 to 48 hours before and after painting)
- Mild temperatures
- No heavy rain forecast
- Avoid very hot direct sun if possible, as paint can dry too quickly
Step 2: Clear the deck completely
Remove all furniture, plant pots, rugs, and anything else sitting on the decking. You want full access to every board.
Then give the whole deck a thorough sweep to remove:
- Dirt
- Leaves
- Dust
- Loose debris
- Moss and surface growth
If debris is left behind, it can affect how the deck paint adheres and may leave a rough finish.
Step 3: Clean the decking properly
This step is essential. Painting over dirt, algae, or old residue will shorten the life of your paint job.
Use a decking cleaner or exterior wood cleaner and scrub the surface well. Pay extra attention to:
- Green patches
- Greasy marks near barbecues
- Dark staining between boards
You can use a pressure washer, but be careful not to damage the timber by using too much force. Let the deck dry fully before moving on.
Tip: If the boards still feel damp, wait. Painting onto damp wood is one of the most common reasons decking paint fails early.
Step 4: Inspect and repair the surface
Once the deck is clean and dry, inspect it closely.
Look for:
- Splinters
- Raised grain
- Cracks
- Loose nails or screws
- Rotten or damaged boards
Make any repairs before painting. Tighten screws, replace damaged boards if needed, and fill small cracks with suitable exterior wood filler.
This step helps create a smoother finish and stops small problems from getting worse later.
Step 5: Sand the deck for a smooth, paint-ready surface
Sanding helps the paint grip properly and improves the final look.
Focus on:
- Rough patches
- Peeling old paint
- High spots
- Splintered edges
If the deck has old flaking paint, scrape off loose areas first, then sand the edges so the surface is even.
After sanding, sweep and dust the deck thoroughly. Any leftover dust can affect the finish of your decking paint.
Step 6: Mask edges and protect surrounding areas
Use masking tape and dust sheets to protect nearby surfaces such as:
- Brick walls
- Door frames
- Patio slabs
- Skirting around the deck
This gives you a neater finish and saves time on clean-up.
Step 7: Apply primer (if needed)
Some decking products are self-priming, while others need a separate primer, especially on bare timber or previously untreated wood.
Check the product instructions carefully.
If a primer is required:
- Stir it well
- Apply evenly with a brush/roller
- Allow it to dry fully before painting
Skipping this step when needed can reduce the durability of the decking paint.
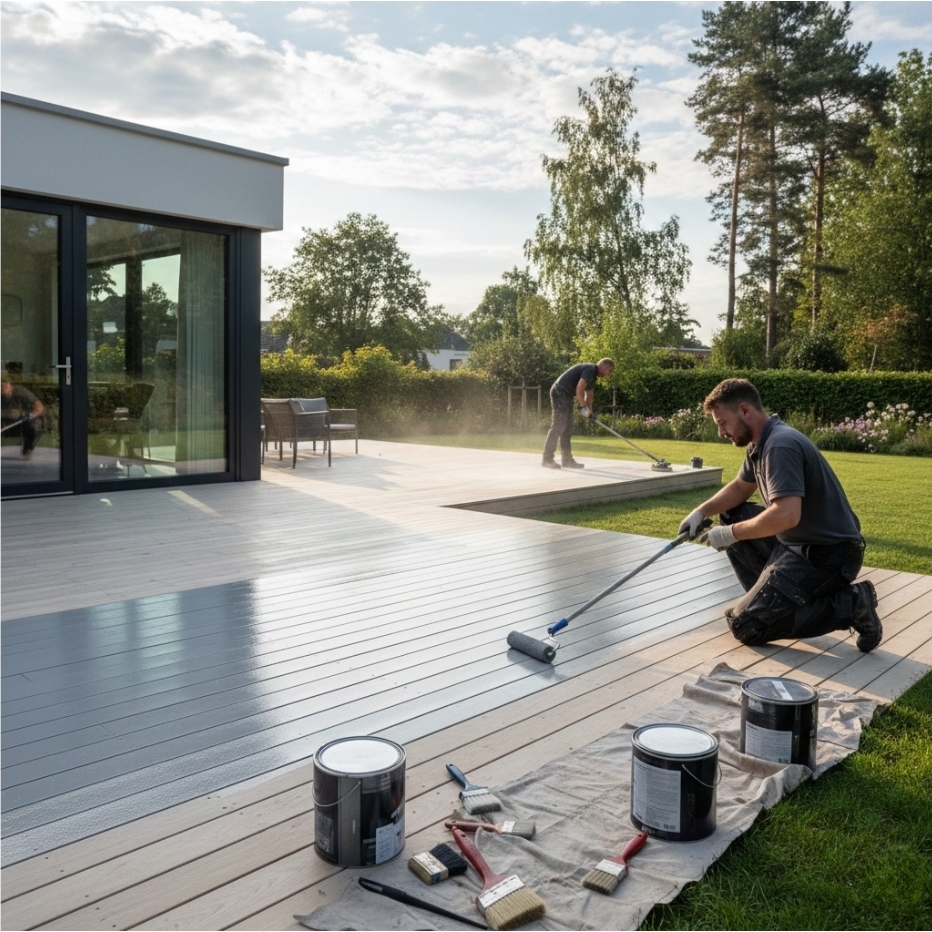
Step 8: Apply the first coat of decking paint
Now for the satisfying part.
Stir your decking paint thoroughly before use. Do not rush this, especially if the paint has been sitting for a while.
Start with a brush around edges, corners, and between awkward areas, then use a roller for the main boards.
Best practice:
- Work in the direction of the wood grain
- Paint a few boards at a time
- Keep a wet edge to avoid lap marks
- Do not overload the roller
Also plan your route so you do not paint yourself into a corner. Start at the far end and work back towards the exit.
Step 9: Let it dry properly
Drying times vary by product and weather conditions, so always follow the label instructions.
Even if it feels touch dry, do not rush the second coat. Proper drying helps the finish harden and improves long-term performance.
Step 10: Apply a second coat for a professional finish
A second coat is usually what gives your deck that even, durable, pro-level finish.
Apply the second coat in the same way:
- Brush edges first
- Roller across boards
- Work with the grain
- Keep the coverage even
Two coats of decking paint generally provide better colour depth, longer wear, and improved weather resistance than one coat alone.
Safety Matters: Why Non Slip Decking Paint Is Worth It
Decking can become slippery very quickly in the UK, especially in shaded areas or after rain.
Using non slip decking paint is a practical upgrade if:
- Your deck is exposed to frequent rain
- Children use the area regularly
- Elderly family members visit
- The decking is near steps or a slope
- You have pets running in and out
A good non slip decking paint helps improve grip underfoot while still giving you the finish and colour you want. It is a simple way to make your outdoor space safer without changing the overall look.
Common Mistakes to Avoid When Painting a Deck
Even good-quality deck paint can fail if the prep or application is rushed. Avoid these common mistakes to get longer-lasting results.
Painting damp wood
This is one of the biggest issues. If moisture is trapped under the paint, it can cause peeling, blistering, or patchy coverage.
Skipping the cleaning stage
Dirt, algae, and grease stop the paint from bonding properly. Always clean thoroughly first.
Applying thick coats
Heavy coats take longer to dry and can leave uneven patches. Thin, even coats usually perform much better.
Ignoring product instructions
Every decking paint product has its own drying times and application advice. Follow the label for best results.
Using the deck too soon
It is tempting to move furniture back immediately, but fresh paint needs time to cure. Waiting a little longer protects the finish.
Maintenance Tips for Long-Lasting Results
Once your deck is painted, a little upkeep will help it stay looking smart for much longer.
Sweep regularly
Leaves and dirt trap moisture, which can lead to staining and slippery patches.
Wash occasionally
Give the deck a gentle clean every so often to remove grime, algae, and garden residue.
Touch up worn areas early
High-traffic spots can wear faster. Small touch-ups with matching decking paint help prevent bigger rework later.
Watch for water pooling
If water sits in one area after rain, keep an eye on that section. Standing moisture can reduce the life of the finish.
Recoat when needed
Over time, all exterior finishes wear down. Recoating before the paint fully fails is easier and usually gives better results than starting from scratch.
Final Thoughts
Painting your deck is one of the easiest ways to improve your garden without a major renovation. With proper prep, the right decking paint, and a bit of patience, you can get a durable finish that looks neat, professional, and built to handle British weather.
If you are planning your next DIY job, Trade Supplies UK offers a practical range of decorating and maintenance essentials to help you get the job done properly.