Jackets can be a smart product for a growing brand, but they are also easier to get wrong than basics like tees. There are more parts, more steps, and more chances for small details to slip. A zipper choice made too late, a lining spec that is unclear, or a pocket placement that is not confirmed can turn into delays and rework.
This guide is a practical playbook for founders, product teams, and small brands. It focuses on the real steps that help you pick a jacket manufacturer and run a smoother project from first message to final delivery.
Define the jacket you want to make
Before you contact any factory, get clear on what you are building and what “good” looks like. You will get better quotes, faster sampling, and fewer misunderstandings.
Write down:
- Jacket type and use case
- Must-have details
- Target customer and target price
- Estimated quantity and size range
- Target delivery window
If you have a full tech pack, great. If you do not, you can still start with strong reference photos, rough measurements, and a clear list of key details like zipper style, pocket layout, and branding placement. That is often enough to begin a first round of discussion and sampling.
Choose a manufacturer who can explain their workflow
When you are screening suppliers, do not just ask “Can you make jackets?” Ask them to walk you through how a project runs.
A clear jacket workflow often includes:
- Project consultation
- Sourcing materials
- Sample making
- Sample revisions
- Bulk production with quality control
- On-time delivery coordination
Suppliers who can explain these steps in plain language are easier to work with because you know what happens next and what they need from you.
Some manufacturers also publish their workflow so brands can understand the process in advance. One reference example is Valtin Apparel, which shares a step-by-step manufacturing process that brands can use as a benchmark when comparing suppliers.
Ask jacket-specific questions that reveal real capability
Outerwear is not only about sewing. Fit, construction, and finishing matter more because jackets are structured, layered, and used in motion.
Ask questions like:
- Have you produced jackets with similar construction and materials?
- Can you handle trims and hardware like zippers, snaps, and drawcords reliably?
- How do you manage lining, insulation, and internal seams?
- What is your typical sample timeline for a jacket?
- How many sample revision rounds are common?
- What is your minimum order quantity?
A jacket workflow often includes sampling followed by one to two revision rounds before bulk production. A good supplier will set expectations early instead of promising unrealistic speed.
Treat sampling like a test, not a formality
Sampling is where you confirm fit, materials, and construction before you invest in bulk production.
What you should share for sampling
A practical set of inputs can include:
- Sketches or reference photos
- Rough measurements or a preferred fit sample
- Fabric direction or what the jacket needs to do
- Branding files and placement notes
- Special details like zipper type, lining choice, hood shape, and pocket construction

You do not need everything perfect on day one, but you do need to be clear about your priorities.
What a typical sampling stage can look like
In one common workflow, sampling can take around 10 to 14 days after details are confirmed. You receive a prototype made to your requested specifications, then you provide feedback for revisions.
How to review the sample like a customer would
When you receive a sample, test it in real use:
- Try it on and check comfort, movement, and layering room
- Zip and unzip it repeatedly to check smoothness and alignment
- Check seams, stitching, and reinforcement points
- Inspect labels, branding placement, and overall finishing
- Take photos and give clear notes with visual markup
Most jacket projects need one to two revision rounds to get fit and construction right. That is normal and should be part of your plan.
Lock the details before bulk production
Once the sample is approved, bulk production is where time and cost scale up fast. This is the stage where you want zero ambiguity.
Confirm in writing:
- Final specifications based on the approved sample
- Size breakdown and quantity per size
- Color options and quantities per color
- Label and branding placement
- Packaging requirements
- Shipping method and destination
In many workflows, bulk production begins after sample approval, a deposit, and a final invoice step. Confirm what triggers the production start so you do not lose time waiting on approvals.
Understand quality control checkpoints
Quality control should not be a single check at the end. It is more reliable when it happens at key points during production.
A practical QC process can include:
- Fabric inspection for defects and color issues
- Cutting checks to match the pattern and spec
- In-line QC during sewing to catch repeated errors early
- Final QC after finishing to confirm sizing, stitching, trims, branding, and packaging
If you are working remotely, ask whether the supplier can share QC photos or short videos before shipment. It can help you spot issues while there is still time to fix them.
Know the most common red flags
If you are trying to avoid costly mistakes, watch for these warning signs:
- Quotes that are vague and do not list what is included
- A supplier who pushes you to skip sampling
- No clear revision process for samples
- No clear QC checkpoints during production
- Unwillingness to confirm specs, timelines, and responsibilities in writing
A jacket project runs best when both sides agree on a process and follow it closely.
Plan packaging and branding earlier than you think
Jackets often include more branding and packaging elements than basics. Waiting too long can cause delays or a mismatched presentation.
Common elements include:
- Custom labels
- Printed hang tags
- Polybags and carton requirements
- Barcodes or SKU labeling for inventory systems
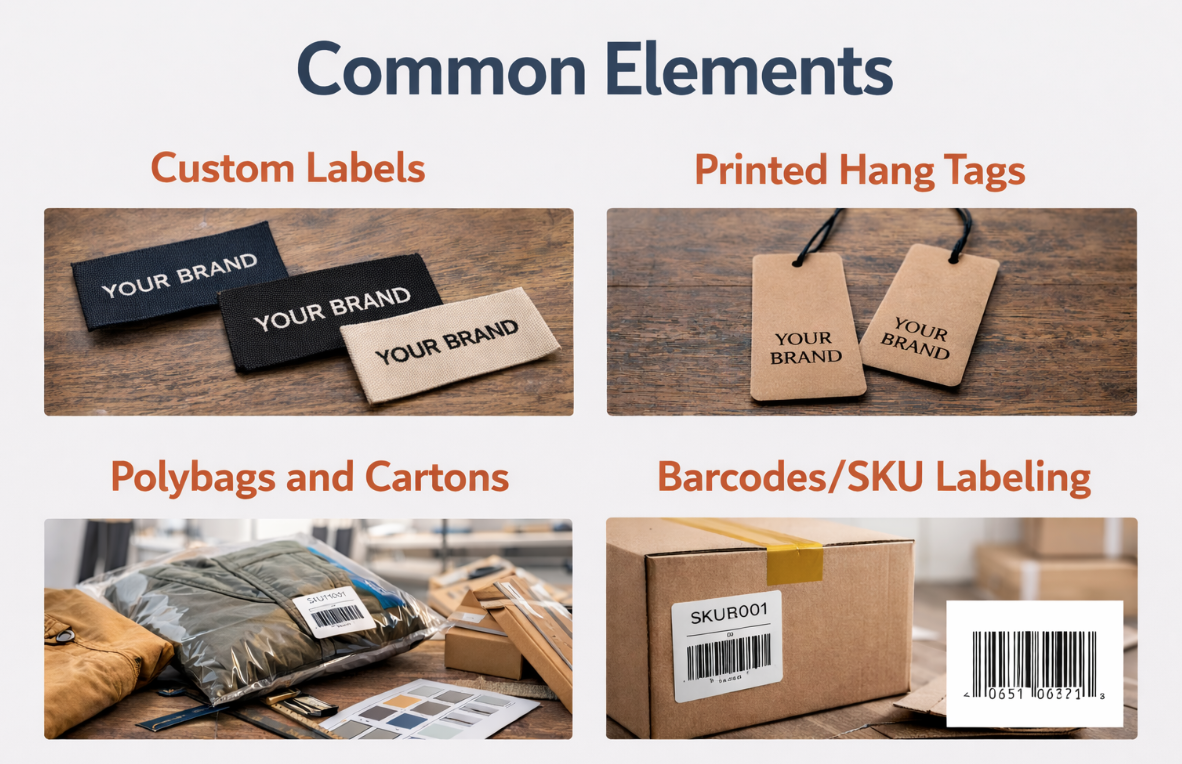
If your order is going to a warehouse or fulfillment center, confirm their labeling and carton rules early. It saves time during inbound.
Prepare for delivery with a simple checklist
Before shipment, ask for the key details that help you confirm the order is ready.
A practical checklist includes:
- Final QC photos or videos
- Packing list
- Shipment weight and carton dimensions
- Final invoice for the remaining balance
Shipping options often include air freight and sea freight, with different trade-offs on speed and cost. In one common workflow, air can be around 5 to 10 days and sea can be around 25 to 40 days, depending on destination and conditions.
If you want a detailed reference that lays out a full jacket workflow, the quality control checkpoints, and what brands typically confirm before shipping, you can compare your supplier’s process against this Jacket Manufacturer overview.
Build buffer time into your launch plan
Even with a strong process, delays can happen. Materials can arrive late, revisions can take longer, and shipping can change. A simple way to protect your launch is to add one to two weeks of buffer around your expected delivery date.
While goods are in transit, you can still move the launch forward by planning product photos, finalizing product pages, setting up inventory systems, and preparing marketing content.
Final
A smooth jacket project is not about luck. It is about choosing a partner with a clear workflow and running the project with strong inputs, clean approvals, and realistic timelines. Define the jacket clearly, treat sampling as a real test, lock details before bulk production, and make QC and delivery planning part of your process from day one.